Lead Media
Lead media always appear at the top of a page, either above or behind the page header. A lead media content region stretches all the way across the main content region of a page. Lead Media also appear in stories and events.
Lead media images must be cut to three specific dimensions so that they can be viewed across all screen sizes. Lead media should be atmospheric and convey the tone of a page's content.
Hermes relies on these three image ratios: hero, promo, and thumbnail. For images on landing pages or in the lead media region on landing and secondary pages, you will need to create your image in these three sizes before uploading to Cascade:
-
Hero: 3840x1280
-
Promo: 3840x2160
-
Thumbnail: 1440x1440
Using the diagrams below as a reference point, take note of how an image may have to be manipulated to fit these three ratios. Hero images are short and work best when the subject is captured from a distance. Promo images are typically the easiest to work with as their size is only slightly shorter than the size of an average photograph. Thumbnail images are equal in height and width meaning you may have to zoom in closer to your image so that there is a clear point of focus.


Creating an Image Folder
Once you have created your image files using the above three image ratios, you are ready to add your images to Cascade using an Image Folder. Image Folders are unique to lead media and only available in the _cdncontent site. Cascade uses Image Folders to automatically choose the best image ratio for a particular screen size (desktop, tablet, or mobile).
To upload lead media, begin by creating an Image Folder:
-
Navigate to the _cdncontent site in Cascade.
-
Create a new folder by navigating to the page on your site, typically found under hermes > images > Your Site Name > Your Page Name. Then select the Add Content at the top of the page. Select Create-Image-Folders. Name your folder in the Folder Name text region to indicate where this image will be visible on the page (ex: “lead” or "gateway"). Then select Submit.
-
This folder automatically creates four subfolders: custom, hero, promo, and thumbnail. The custom image folder is used in custom image circumstances. In most cases, you can either delete or ignore this folder.
Uploading an Image
-
To upload the Hero image, open the Hero folder in Cascade. Select Add Content and from that menu, select Brand Image Sizes followed by Hero-3840x1280.
-
From the file upload screen that appears, upload your hero-size image. In the File Name field, name the image by subject and size, such as fountain-hero. In the Alt Text field, enter a short description of the image. This field is important for accessibility and is required.
-
Click Submit, and Cascade will populate the folder with additional versions of the image for all screen resolutions (mobile, tablet, and desktop).
-
Repeat this process for the remaining two ratios (promo and thumbnails) by selecting each ratio folder, then selecting its respective image size.
-
Once you have created the suite of images, publish the parent folder of these images. Do NOT publish the hermes > images folder, as this will create a backlog of publishing for all Cascade users.
Adding Lead Media to Your Page
-
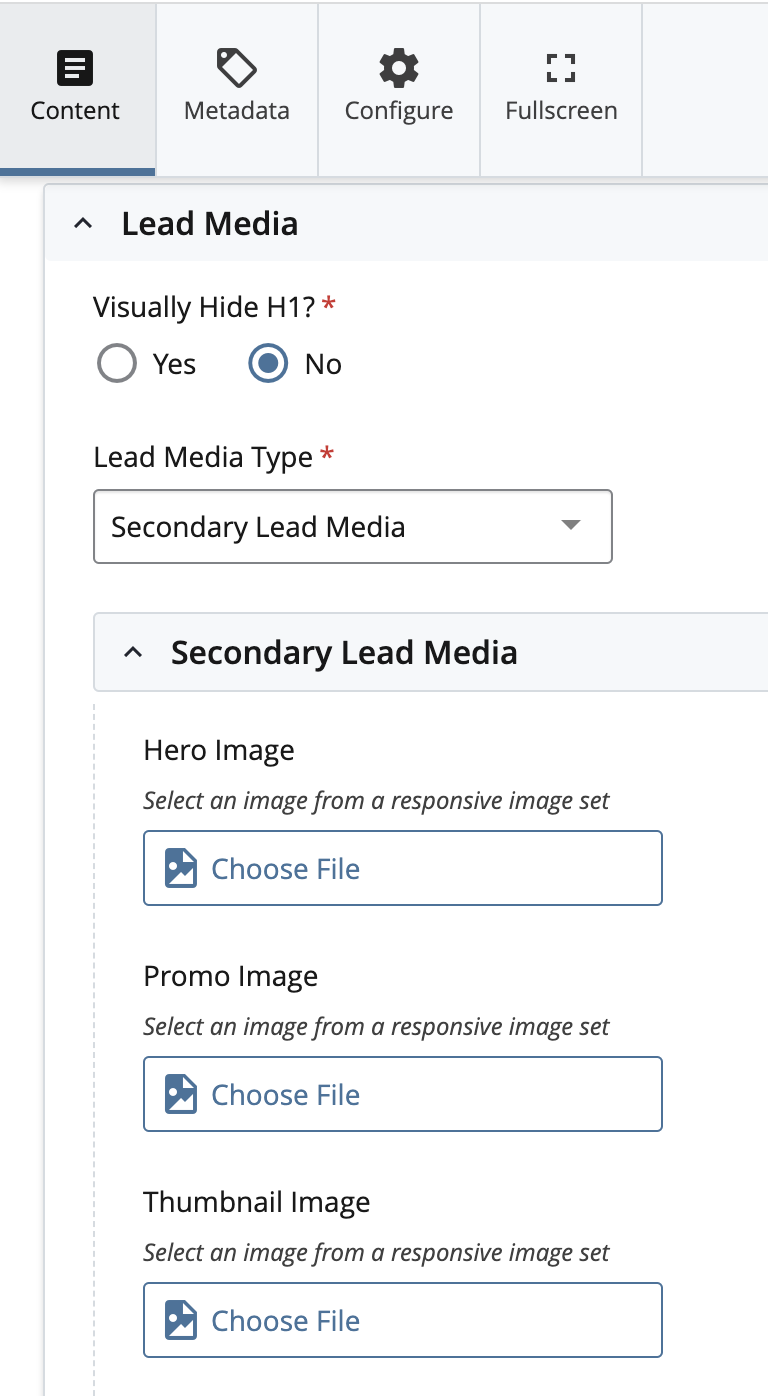
To connect this image to your page, find the page in Cascade and select Edit. Then select the Lead Media field. Under the Lead Media Type menu, select Secondary Lead Media.
-
Under the Secondary Lead Media menu that appears, begin by selecting Choose File under the Hero Image section. A pop-up window will appear. Click “Browse…” and navigate to the _cdncontent folder within Cascade, where you just stored your image. (Alternatively, your recent asset history should also appear when you click Choose File, and you can choose the image you need from this list.) Select the original image file you uploaded (ex: fountain-hero) and then select Choose.
-
Repeat this process for the Promo Image and Thumbnail Image sections below.
-
Submit and Publish your page.